PIONEER TYPICAL CLUB SETUP
The term "Pioneer typical club setup" refers to the Pioneer gear you usually expect to find preinstalled on clubs around the world. On most cases it consists of two (or more) CDJ series media players and one DJM series mixer.
There are three main ways to connect VirtualDJ on such a setup, depending on the actual gear itself:
- HID via LINK: Available only for a setup that consists of one of the DJM-900NXS2, DJM-A9 or DJM-V10 mixer along with any combiination of CDJ-2000NXS2 or CDJ-3000 Players.
Connection instructions - Digital Mixer: Available if the DJM mixer offers a built in audio interface. Supported models currently are DJM-750, DJM-750MKII, DJM-850, DJM-900NXS, DJM-900SRT, DJM-900NXS2 and DJM-2000
Connection instructions - Analog Mixer: Available if the DJM mixer does not offer a built in audio interface (e.g. DJM-800)
Connection instructions
HID via LINK
Description
HID via LINK is a communication protocol introduced by Pioneer with the DJM-900NXS2 mixer.
It allows the end user to connect up to 4 CDJ devices and a DJM mixer via LAN cables (LINK) and then use one single USB connection on the mixer to connect them all via HID protocol to a PC/MAC computer.
Currently, the only devices known to support this protocol in VirtualDJ are the ..
Pioneer mixers : DJM-900NXS2, DJM-V10, DJM-A9
combined with any ...
Pioneer CDJ Players : CDJ-2000NXS2, CDJ-3000
When a DJM-V10 is used, up to 6 CDJ-3000 devices can be connected via HID-LINK.
The details and images below is just an example of connecting and working with a DJM-900NXS2 along with the CDJ-2000NXS2, but all other combinations can be achieved with similar procedure.
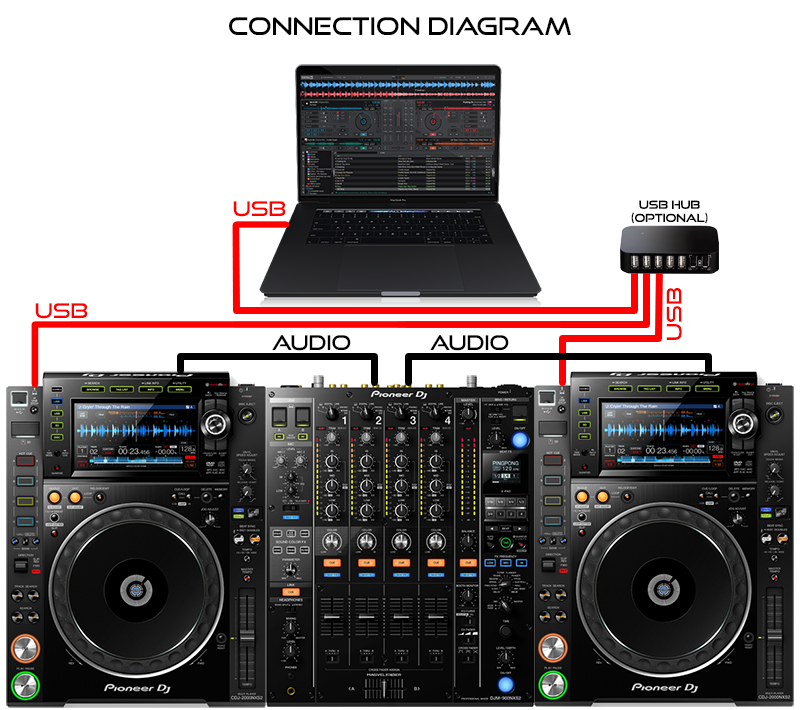
Hardware setup

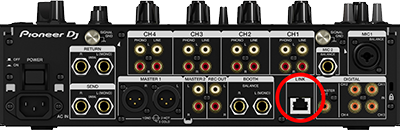
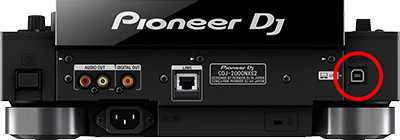
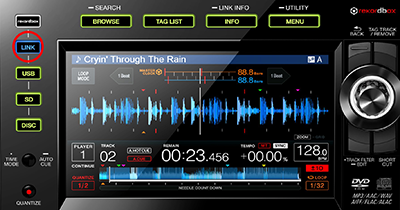
- Connect the "LINK" port on the back of each CDJ with a network switch.
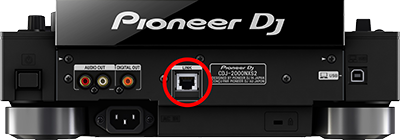
- Connect the "LINK" port on the back of the DJM on the same network switch.
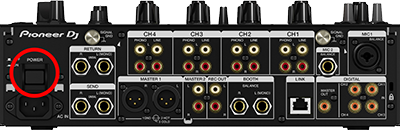
- Power up the DJM mixer.
- Power up the CDJ's with the order you would like to use them (power up "deck 1" first, "deck 2" second e.t.c.).

- Wait until "Player" number on CDJ's screen stops blinking.
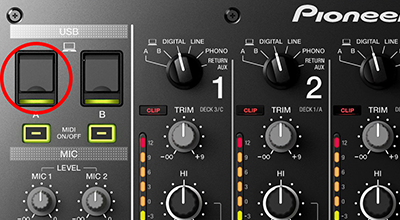
- Use a standard USB cable to connect your PC/MAC with one of the USB ports of the DJM mixer.
> It is not necessary to connect your PC/MAC on the same network switch. Communication with PC/MAC is done via USB connection, and not via LAN.
> It is not necessary to connect any audio cables between the CDJs and the mixer. The audio will be produced by the sound interface of the DJM mixer.
Attention: Due to the way LINK protocol works, it's common practice on clubs with just two CDJ's to see a network cable going from one CDJ to another, forming a 2 point LINK network. Such a network will not work for HID via LINK. You will need to connect the CDJ's and the mixer on a network switch in order to create a "multi-point" LINK network.
Drivers
For both Windows and Mac OS X computers install the latest firmware and drivers for DJM-900NXS2 mixer from PioneerDJ.
Attention MAC OS X users:
MAC users using OS X 10.13 or greater need to allow the drivers to run via [System Preferences] > [Security & Privacy] applet before using the controller. For more information please read Pioneer DJ documentation on this subject.
VirtualDJ Setup
(in case you have not done so already)
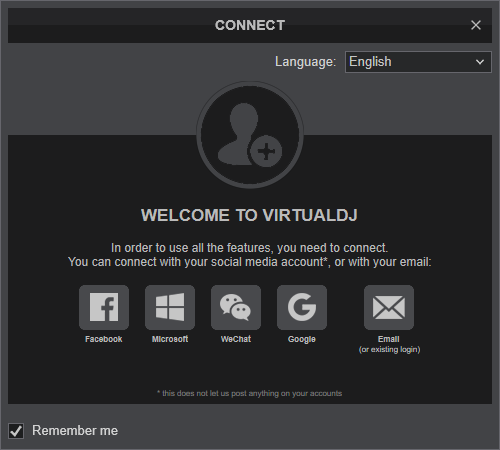
Once VirtualDJ is launched, a Login Window will appear. Please login with your preferred method from the ones provided.
A Pro Infinity or a Pro Subscription License is required to fully use this setup.
Without one of these licenses, the setup will operate for 10 minutes each time you restart VirtualDJ.
Buy a license

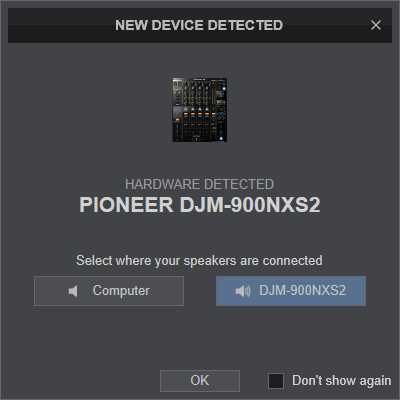
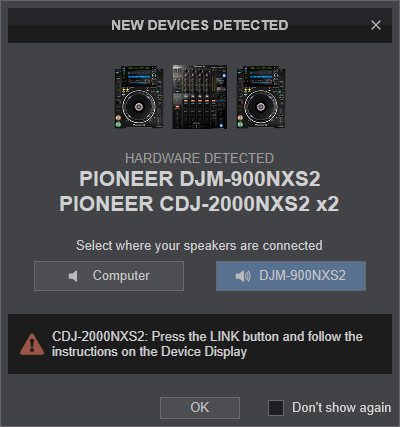
Click on the "DJM-" button for VirtualDJ to apply the predefined audio setup with the built-in sound card of the DJM-. You can still change that from Settings->AUDIO tab.
Click to OK.
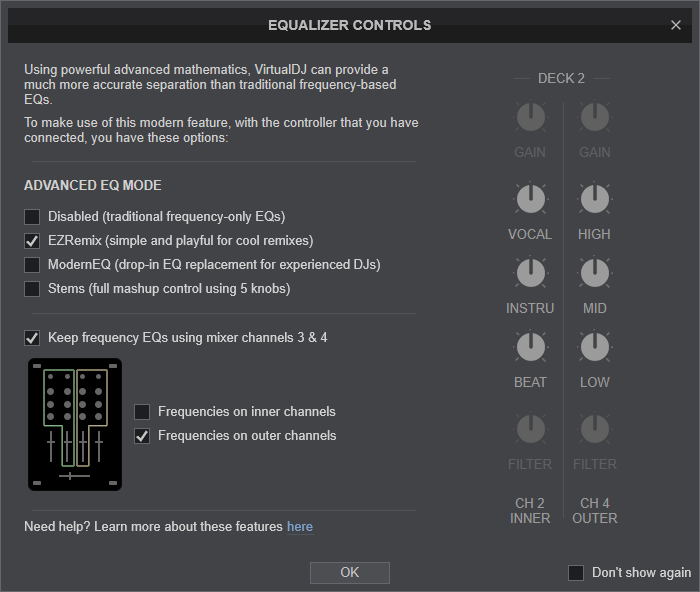
Select one of the desired operation modes for EQ.
Click to OK.


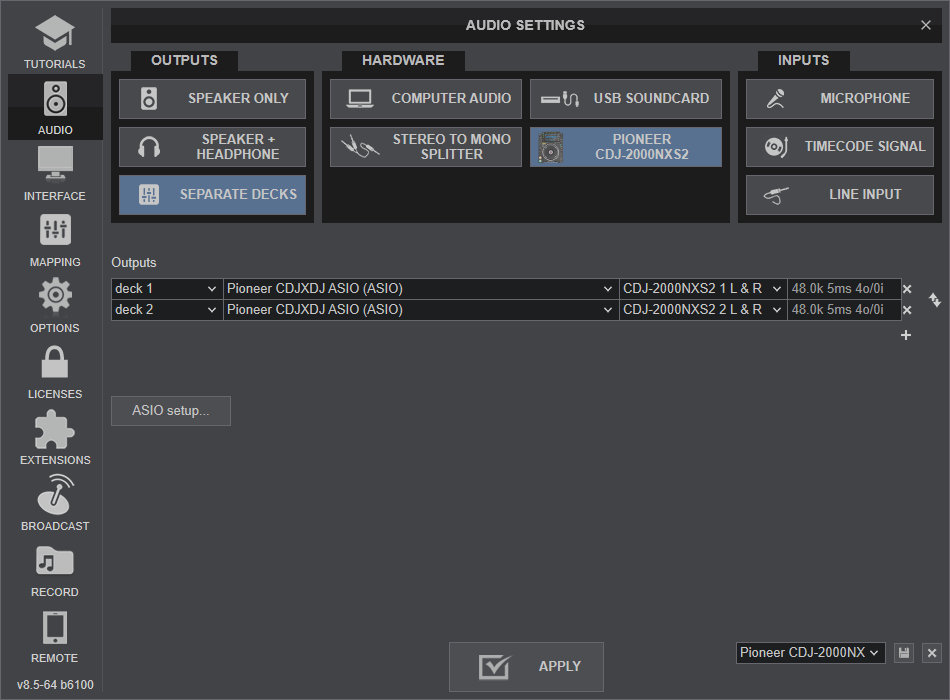
AUDIO Setup
DJM-900NXS2 has a pre-defined Audio setup and a special button in the AUDIO tab of Config to provide that. Alternative Audio setups can be applied in the same window.

HID Setup
DJM-900NXS2 (or DJM-A9 / DJM-V10 depending the mixer of your setup) should be visible in the MAPPING tab of Config and the “factory default” should be available/selected from the Mappings drop-down list. The factory default Mapping of the mixer also hosts the mapping of the connected CDJ devices that are connected via LINK protocol on the mixer.
If you wish to change the behavior of some button(s) on your CDJ (while you have them connected via LINK protocol on the DJM mixer) then it's the mapper of the mixer that you must change, and not the mapper of the CDJ's themselves.

Deck Assignment
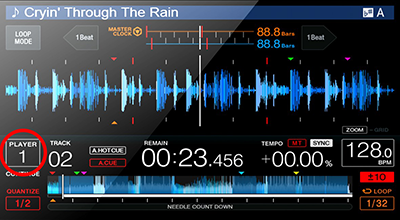
When using the LINK protocol, the "player" number displayed on the CDJ screens is what dictates the deck assignment of each CDJ on VirtualDJ.
By default CDJ's calculate their player number automatically when they join the LINK network.
However if the deck order is not as you wish, you can use the UTILITIES menu on the CDJ's screen to change each player number to your desired value.
Note: By default each CDJ takes the lowest player number available on LINK network at the moment it joins the network (usually at startup if all connections are done properly). That's why powering up CDJ's with the desired order may save you the frustration of entering UTILITIES menu and assigning each deck manually.
Attention: Do not use deck assign menu on mappers page above to modify the assignment of the CDJ's connected to VirtualDJ, as this will completely mess up the mixer functions.
Mixer Order
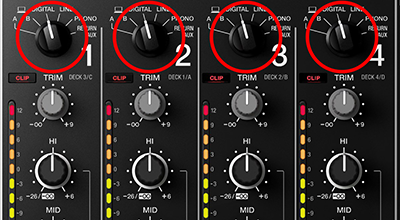
The default mixer channels order for this setup is 3124. This means that the 2 main mixer channels (for decks 1 & 2) are the central ones and the outer ones are assigned to deck 3 on the left and deck 4 on the right.
This order also allows you to manipulate stems of VirtualDJ by using the outer mixer channels if you use only 2 decks for mixing.
If you wish to change the mixer channel order to match the silkscreen of the mixer (1234) then you need to open VirtualDJ settings, click on "Options" icon on the left, then click "Controller" icon and change the "mixerOrder" setting to 1234.
For further information regarding the functionality of the mentioned devices, please read ..
Pioneer CDJ-3000 Manual
Pioneer DJM-900NXS2 Manual
Pioneer DJM-A9 Manual
Pioneer DJM-V10 Manual
Digital Mixer
Description
"Digital Mixer" as a term is used here to describe audio mixers that offer a built-in sound interface and they also offer connection to PC/MAC via a simple USB connection.
Such models are: DJM-250, DJM-250MKII, DJM-450, DJM-750, DJM-750MKII, DJM-850, DJM-900NXS, DJM-900SRT, DJM-900NXS2, DJM-2000, DJM-S3 and DJM-S9.
The main concept in this setup is that you use the mixer's sound interface to playback audio, while you use the CDJ's only as HID devices to control VirtualDJ functions. This method allows users to use "Advanced EQ" (stems) features of VirtualDJ 2021, easier DJ take overs, and easier transition between the various media sources on the CDJ players.
This guide assumes that your setup consists of CDJ-2000NXS2 players and DJM-900NXS2 mixer, but the main principals are the same for all CDJ players and DJM mixers that offer a USB port connection.
This is the second most preferred way to connect a setup that consists solely of CDJ-2000NXS2 players and DJM-900NXS2 mixer.
Hardware setup

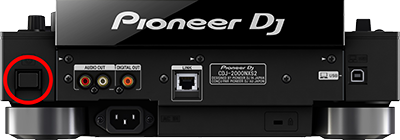
- Connect the "USB" port on the back of each CDJ with a USB hub, or a USB port on your computer.
- Connect one of the "USB" ports on top of the DJM on the same USB hub, or a USB port on your computer.

- Power up the DJM mixer.

- Power up CDJ's.

> It is not necessary to connect any audio cables between the CDJs and the mixer. The audio will be produced by the sound interface of the DJM mixer.
Drivers
For both Windows and Mac OS X computers install the latest firmware and drivers for your mixer from PioneerDJ.
Attention MAC OS X users:
MAC users using OS X 10.13 or greater need to allow the drivers to run via [System Preferences] > [Security & Privacy] applet before using the controller. For more information please read Pioneer DJ documentation on this subject.
VirtualDJ Setup
(in case you have not done already)
Once VirtualDJ is launched, a Login Window will appear. Please login with your preferred method from the ones provided.
A Pro Infinity or a Pro Subscription License is required to fully use this setup.
Without any of the above Licenses, the setup will operate for 10 minutes each time you restart VirtualDJ.
Buy a license
Click on the "DJM-900NXS2" (or your own mixer model) button for VirtualDJ to apply the predefined audio setup with the built-in sound card of the DJM-900NXS2. You can still change that from Settings->AUDIO tab.
Click to OK.
Select one of the desired operation modes for EQ.
Click to OK.

AUDIO Setup
DJM-900NXS2 (or your own mixer model) has a pre-defined Audio setup and a special button in the AUDIO tab of Config to provide that. Alternative Audio setups can be applied in the same window.

HID Setup
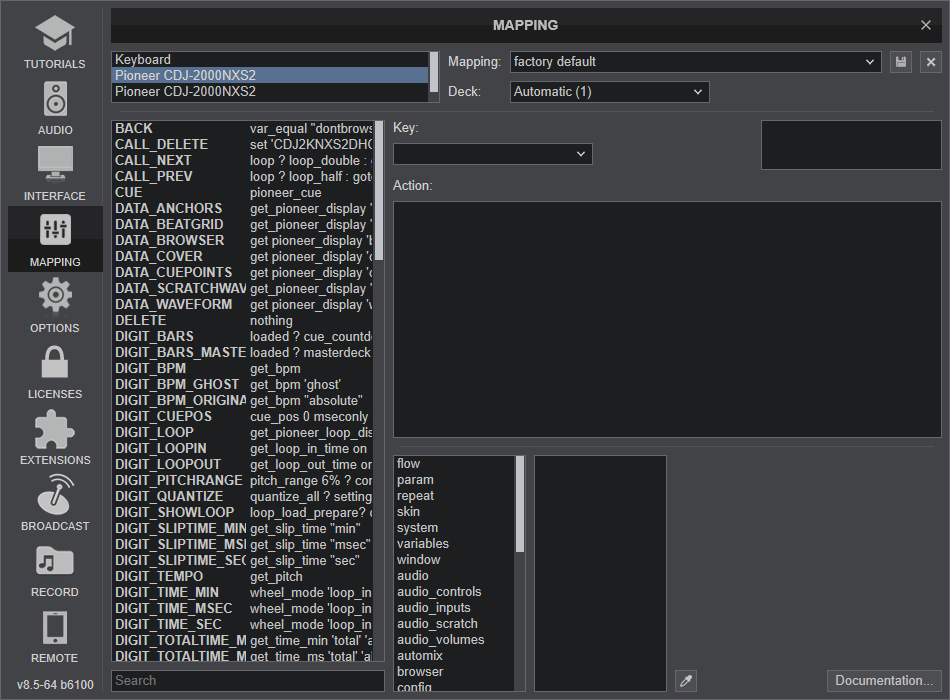
DJM-900NXS2 and CDJ-2000NXS2 (or your own mixer and players models) should be visible in the CONTROLLERS tab of Config and the “factory default” should be available/selected from the Mappings drop-down list.

Attention DJM-900NXS2 users:
The factory default Mapping of DJM-900NXS2 also hosts the mapping of the CDJ-2000NXS2 devices that are connected via LINK protocol on the mixer. Since this connection is not using the LINK protocol, any changes made on the mapping of DJM-900NXS2 regarding CDJ-2000NXS2 operation, will not apply!
If you wish to change the behavior of some button(s) on your CDJ-2000NXS2 it's the mapper of the CDJ-2000NXS2 themselves that you must change.
Deck Assignment
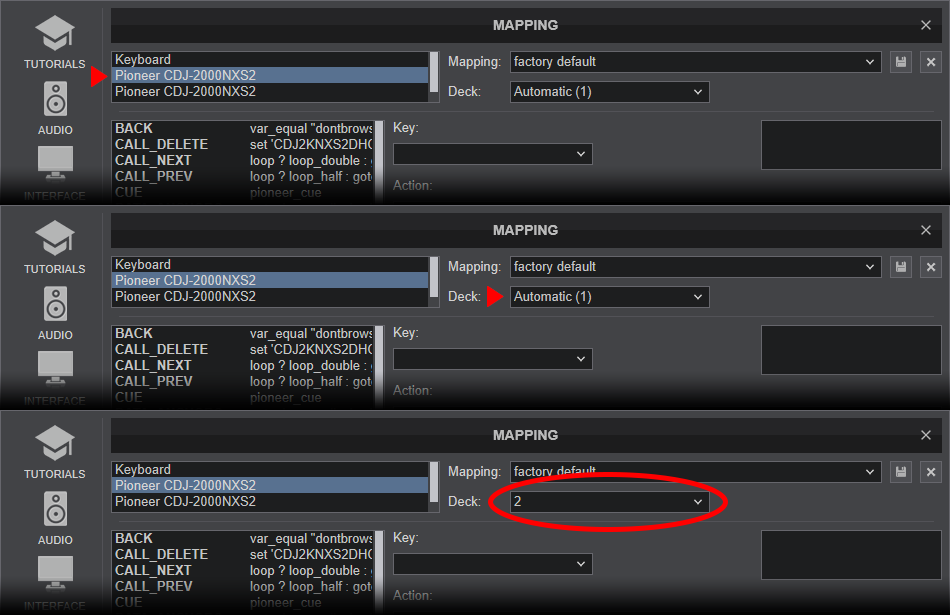
By default first CDJ (as listed by your OS) is assigned to first deck in VirtualDJ, second CDJ to second deck e.t.c.
However if this order does not match the physical layout of your CDJ's you can change each CDJ's deck assignment as follows:
- Open VirtualDJ settings.
- Click on "Mapping" tab on the left.
- Select the first CDJ on the list.
- Click on "Deck" assignment drop down menu.
- Select the correct deck (e.g. 2) from the list.

- Select the second CDJ on the list.
- Click on "Deck" assignment drop down menu.
- Select the correct deck (e.g. 1) from the list.

Mixer Order
The default channels order for most DJM mixers is 3124. This means that the 2 main mixer channels (for decks 1 & 2) are the central ones and the outer ones are assigned to deck 3 on the left and deck 4 on the right.
This order also allows you to manipulate stems on VirtualDJ 2021 by using the outer mixer channels if you use only 2 decks for mixing.
If you wish to change the mixer channel order to match the silkscreen of the mixer (1234) then you need to open VirtualDJ settings, click on "Options" icon on the left, then click "Controller" icon and change the "mixerOrder" setting to 1234.
Analog Mixer
Description
"Analog Mixer" as a term is used here to describe audio mixers that don't offer a built-in sound interface.
In this setup you use the CDJ's both as control surfaces for VirtualDJ functions and as sound interfaces to playback audio.
This method can be used with ANY mixer, but has the most limitations.
This guide assumes that your setup consists of CDJ-2000NXS2 players, but the main principals are the same for all CDJ players.
This is the least preferred way to connect a setup that consists of CDJ players and a DJM mixer, and it should be used only if the mixer doesn't offer a sound interface.
Hardware setup
- Connect the "USB" port on the back of each CDJ with a USB hub, or a USB port on your computer.

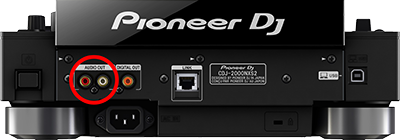
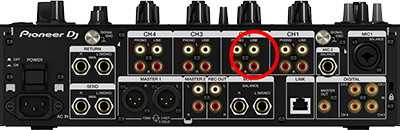
- Connect the "Audio Out" terminals on the rear of each CDJ with a "Line" input on the back of your mixer by using a pair of standard RCA cables.
- Power up CDJ's.
Drivers
For both Windows and Mac OS X computers install the latest firmware for your CDJ's from PioneerDJ.
Windows users: Install the latest drivers for your CDJ's from PioneerDJ.
MAC OS X users: You don't need to install any drivers, nor the Pioneer aggregation tool for CDJ's to operate correctly as sound interfaces with VirtualDJ.
VirtualDJ Setup
(in case you have not done already)
Once VirtualDJ is launched, a Login Window will appear. Please login with your preferred method from the ones provided.
A Pro Infinity or a Pro Subscription License is required to fully use this setup.
Without any of the above Licenses, the setup will operate for 10 minutes each time you restart VirtualDJ.
Buy a license

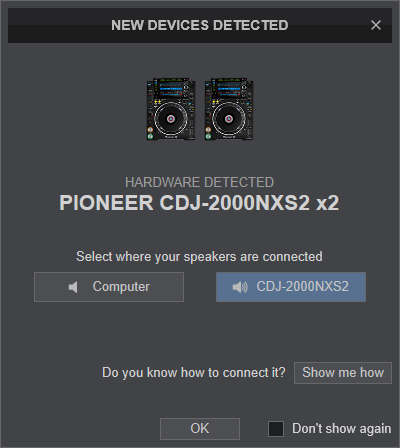
Click on the "CDJ-2000NXS2" (or your own CDJ's model) button for VirtualDJ to apply the predefined audio setup with the sound cards of CDJ-2000NXS2. You can still change that from Settings->AUDIO tab.
Click to OK.
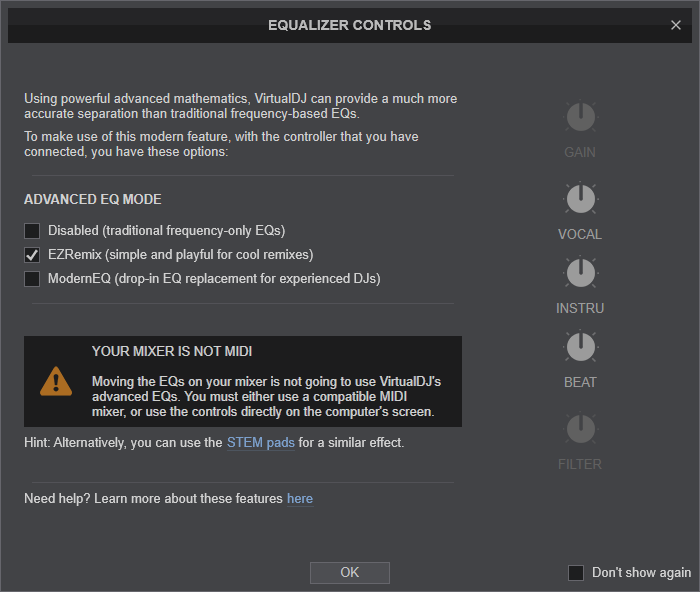
Select one of the desired operation modes for EQ.
Please note that since you are not using a MIDI capable mixer you won't be able to control stems directly from your mixer.
Click to OK.
AUDIO Setup
CDJ-2000NXS2 (or your own CDJ's model) has a pre-defined Audio setup and a special button in the AUDIO tab of Config to provide that. Alternative Audio setups can be applied in the same window.
HID Setup
CDJ-2000NXS2 (or your own CDJ's model) should be visible in the CONTROLLERS tab of Config and the “factory default” should be available/selected from the Mappings drop-down list.
Deck Assignment
By default first CDJ (as listed by your OS) is assigned to first deck in VirtualDJ, second CDJ to second deck e.t.c.
However if this order does not match the physical layout of your CDJ's you can change each CDJ's deck assignment as follows:
- Open VirtualDJ settings.
- Click on "Mapping" tab on the left.
- Select the first CDJ on the list.
- Click on "Deck" assignment drop down menu.
- Select the correct deck (e.g. 2) from the list.
- Select the second CDJ on the list.
- Click on "Deck" assignment drop down menu.
- Select the correct deck (e.g. 1) from the list.
If the audio output of your CDJ's is inverted (left side CDJ plays the sound of right software side)
- Open VirtualDJ settings.
- Click on "Audio" tab on the left.
- Click on the "invert" icon next to audio assignments
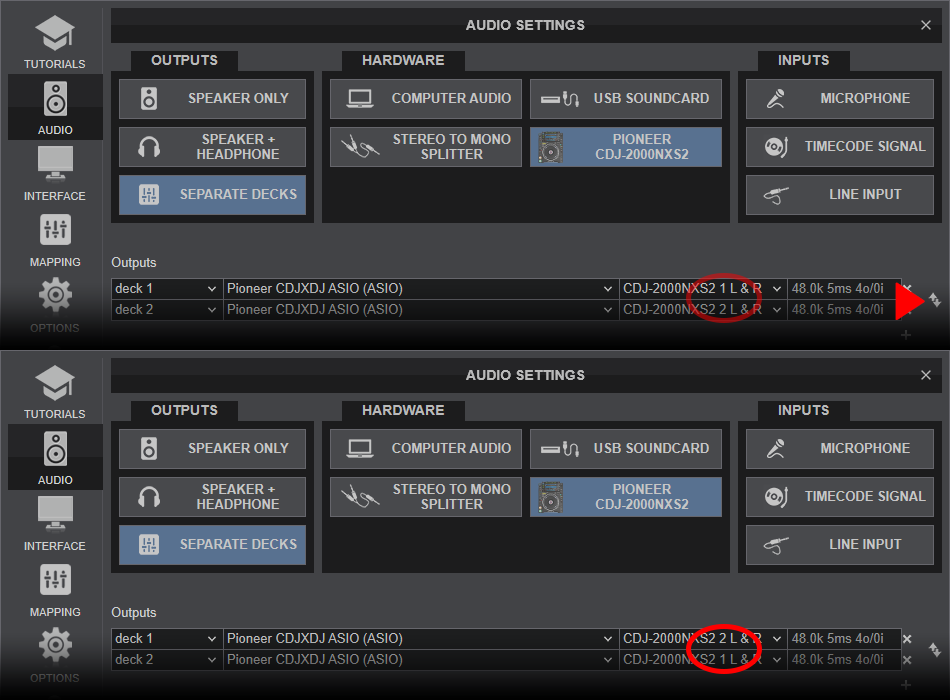
- Click on "Apply" button.
